
Page 68 - Photoshop User March 2017
P. 68
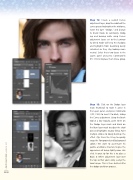
Step 12: Create a second Curves adjustment layer, drag the middle of the curve upward to brighten the midtones, name this layer “Dodge,” and change its blend mode to Luminosity. Dodg- ing and burning while using Curves adjustment layers set to the Luminos- ity blend mode will keep the shadows and highlights from becoming overly saturated so they stay looking more neutral. Select these two layers in the Layers panel and press Command-G (PC: Ctrl-G) to place them into a group.
Step 13: Click on the Dodge layer mask thumbnail to make it active in the Layers panel, and press Command- I (PC: Ctrl-I) to invert it to black, hiding the Curves adjustment. Using the Brush tool at a low Opacity, paint white on the Dodge layer mask and black on the Burn layer mask to adjust the shad- ows and highlights to your liking. Paint multiple strokes to slowly build up the effect. (Tip: Press the X key to quickly swap the Foreground and Background colors.) We want to accentuate his jawline and bone structure to give the appearance of being slightly more chis- eled. A great tip for this is to place a Black & White adjustment layer over the top so that you’re only seeing the tonal range. This is then deleted after the dodge-and-burn process.
[068]
> PHOTOSHOP USER > MARCH 2017
