
Page 67 - Photoshop User March 2017
P. 67
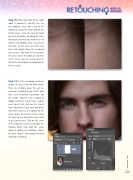
Step 10: Now that most of the color work is complete, identify any tex- ture problem areas that need to be addressed. Using the Patch tool on the
Texture layer, select the area of detail you wish to replace, and drag the selec- tion to an area that you want to use to replace that problem area. Pay special attention to the nose area for stray hairs and sample from the surround- ing texture. You may need to patch the same area in the color area to even it out. There may be several areas in which the Healing Brush would deliver better results.
Step 11: It’s time to dodge and burn to give the face a little bit more depth. There are multiple ways this can be achieved, including using a 50% gray layer and frequency separation. For this image, however, we’re going to dodge and burn using Curves adjust- ment layers. First, click on the Create New Adjustment Layer icon (half-black, half-white circle) at the bottom of the Layers panel and select Curves. Drag this layer to the top of the layer stack in the Layers panel. Click on the curve in the Properties panel just below the halfway point and drag the curve down to darken the midtones. Name this layer “Burn,” and change its blend mode to Luminosity.
[067]
> KELBY ONE.COM
