
Page 70 - Photoshop User March 2017
P. 70
Step 17: With men, we want to enhance the details of their features. Unlike women, the more texture in the skin the better. A great way to achieve the desired rugged results is to utilize High Pass sharpening. Duplicate the Back- ground layer twice and rename the layers “low” (a.k.a. color in frequency sepa- ration) and “high” (a.k.a. texture in frequency separation).
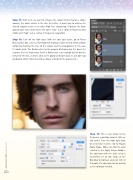
Step 18: Turn off the High layer. With the Low layer active, go to Filter> Blur>Surface Blur. Select a Threshold that maintains some level of detail without completely blurring the lines of the subject and the background. In this case, 15 works great. The Radius refers to the amount of sharpening: the lower the number, the less sharpening. Select a Radius that’s just enough to blur out the texture of the skin, as that’s what we’re going to sharpen back in, but don’t go overboard. (Note: You’ll need to use lower settings on the practice file.)
Step 19: This is very similar to the frequency separation process that we did earlier. Turn the High layer back on and make it active. Go to Image> Apply Image. Make sure that the layer selected in the Apply Image dialog is the Low layer with the Scale set to 2 and Offset set to 128. Also, set the Blending to Subtract, and click OK. At this point, the Low layer can be deleted, as it’s no longer needed.
[070]
> PHOTOSHOP USER > MARCH 2017
