
Page 46 - Photoshop User January 2017
P. 46
HOW TO ››
046
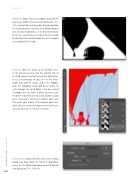
Step Five: Mouse over to a balloon and paint the gray areas. Zoom in by pressing Command-+ (PC: Ctrl-+) repeatedly, and Spacebar-drag to reposition the image onscreen. Tap the Left and Right Bracket keys on your keyboard ([, ]) to decrease/increase brush size, respectively, as needed. Tip: Use a really big brush on the middle balloon to create a smooth curve around its left edge.
Step Six: Now let’s touch up the balloon wires. In the Channels panel, click the visibility icon of the RGB channel (circled) to view the alpha chan- nel as a red overlay so you can see the wires. Zoom way into the image, and in the Toolbar, grab the Polygonal Lasso tool (press Shift-L to cycle through the Lasso tools). Click one end of a balloon wire to create a point and then click the other end of the wire to create another. Scoot over a few pixels, click to set another point, and then point your mouse at the original point and, when you see a tiny circle appear next to the cur- sor, click to create a very thin selection.
Step Seven: Choose Edit>Fill, and in the resulting dialog, pick Black from the Contents drop-down menu. Set the Mode drop-down menu to Normal and Opacity to 75%. Click OK.
› › photoshop user › january 2017
