
Page 39 - Photoshop User January 2017
P. 39
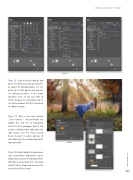
Step 12: Grab the Brush tool (B) and open the Brush panel by pressing F5, or going to Window>Brush. Set the brush tip to Soft Round and increase the Spacing to 200%. In the Shape Dynamics area, set the Size Jitter to 100%. Engage the Scattering, and set the Scatter amount to 700% and check the Both Axes box.
Step 13: Add a new layer named “Dust Particles.” Press-and-hold the Option (PC: Alt) key to temporarily switch to the Eyedropper tool (I) and sample a bright-yellow color from the light streaks. Use the newly created brush to paint in subtle particles of dust floating in the sunlight around the floating model.
Step 14: Add a Photo Filter adjustment layer (Layer>New Adjustment Layer> Photo Filter) and use the Warming Filter (85) filter at a Density of 25%. This adds warmth to the image and increases the surreal feel of the setting.
Step 14
Step 12
› › DOWN AND DIRTY TRICKS
039
› › kelbyone.com
