
Page 37 - Photoshop User January 2017
P. 37
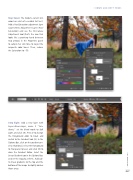
Step Seven: The model’s current skin color has a bit of a reddish tint to it. Add a Hue/Saturation adjustment layer (Layer>New Adjustment Layer>Hue/ Saturation) and use the On-Canvas Adjustment tool (that’s the icon that looks like a pointing hand between two arrows) in the Properties panel to sample her skin tone to target the magenta color tones. Then, reduce the Saturation to –50.
› › DOWN AND DIRTY TRICKS
Step Eight: Add a new layer with Layer>New>Layer, name it “Gra- dients,” set the blend mode to Soft Light, and click OK. Press D to change the Foreground color to black and switch to the Gradient tool (G). In the Options Bar, click on the gradient pre- view thumbnail, select the Foreground to Transparent preset, and click OK to close the Gradient Editor. Select the Linear Gradient icon in the Options Bar, and set the Opacity at 50%. Add sub- tle linear gradients to the top and the bottom of the image to slightly darken those areas.
037
› › kelbyone.com
