
Page 35 - Photoshop User January 2017
P. 35
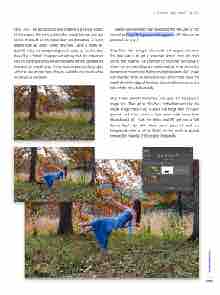
Step One: The background environment is a critical aspect of the project. The setting should be visually familiar, but not boring. It should be interesting but not distracting. A forest setting with fall colors works very well. Using a sturdy tri- pod will make the compositing much easier, as the first shot should be a “blank” background setting shot. It’s important that the camera settings remain the same for the background shot and the model shots. If you want to practice the project with the files shown here, they’re available for download to all KelbyOne members.
[KelbyOne members may download the files used in this tutorial at http://kelbyone.com/magazine. All files a re f or personal use only.]
Step Two: Now bring in the model and support elements. The idea here is to get a pose that doesn’t look like she’s sitting, but floating. Pay attention to how the hair falls and where her arms and legs are positioned, as those are critical elements of creating the feeling of weightlessness. Also, make sure that the stools do not create any obstructions. Have the model sit on the edge of the chair closest to the camera so the folds of the dress fall naturally.
Step Three: Launch Photoshop and open the background image first. Then go to File>Place Embedded and load the model image. Press Enter to place the image over the back- ground, and then create a layer mask with Layer>Layer Mask>Reveal All. Grab the Brush tool (B) and use a Soft Round Brush tip with black paint (press X until the Foreground color is set to black) on the mask to quickly remove the majority of the visible chair pixels.
› › DOWN AND DIRTY TRICKS
035
› › kelbyone.com
