
Page 32 - Photoshop User January 2017
P. 32
HOW TO ››
Step 20
Step 21
Step 20: Using the Move tool, hold the Shift key and drag this HDR-toned image back into the main design file. The Shift key will line it up with the original image. Drag this layer to the top of the layer stack. Set the layer blend mode to Soft Light and the layer Opacity to 50%.
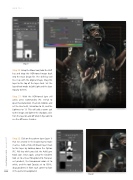
Step 21: With the HDR-toned layer still active, press Command-U (PC: Ctrl-U) to open Hue/Saturation. Check on Colorize and set the Hue to 32, Saturation to 23, and the Lightness to 13. This will add a warm cast to the image and lighten the shadows a bit. Turn the layer on and off (click its Eye icon) to see the difference it makes.
Step 22: Click on the pattern layer (Layer 1) that we created in the beginning to make it active. Add a Hide All (black) layer mask to this layer by holding down the Option (PC: Alt) key while you click the Add Layer Mask icon. Once again, using the Gradient tool set to a linear Foreground to Transpar- ent gradient, the Foreground color set to white, and the tool Opacity set to 100%, drag gradients in from each corner to fade
032 in the pattern background.
Step 22
› › photoshop user › january 2017
