
Page 31 - Photoshop User January 2017
P. 31
› › DOWN AND DIRTY TRICKS
Step 17: Now let’s add a little fade to the bottom of the image. Create a new layer, then add a simple Foreground to Transparent gradient with the tool Opacity set to 75% in the Options Bar and the Foreground color set to black. Drag just a little ways up from the bottom edge of the canvas.
Step 18: Save your work at this point. We’re going to create a contrast and color-grading layer. Go under the Image menu and choose Duplicate. Click OK when prompted, and when the duplicate file opens, go under the Layer menu and choose Flatten Image. Don’t change the image size.
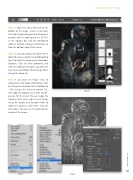
Step 19: Go under the Image menu to Adjustments and choose HDR Toning. Start by setting the Saturation (at the bottom) to –100. Increase the Detail to around 122, then drop the Exposure just a little to com- pensate for the Detail. You can nudge the Gamma a little to the right as well. Finally, tweak the Radius and Strength sliders to adjust the contrast a little more. Click OK when done. You can see it’s a high-contrast version of the image.
Step 17
Step 18
Step 19
031
› › kelbyone.com
