
Page 30 - Photoshop User January 2017
P. 30
HOW TO ››
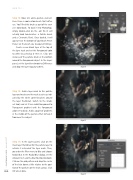
Step 14
Step 14: Now let’s add a particle element. Here I have a cool custom brush that I often use. You’ll find this brush as part of the exer- cise downloads. To load it into Photoshop, simply double-click on the .abr file (it will actually load two brushes: a Particle brush and a Cinematic Flare). Once loaded, it will appear near the bottom of your Brush Preset Picker. Set the brush size to around 1000 px.
Create a new blank layer at the top of the layer stack and set the Foreground color to white by pressing D then X. Click one instance of the particle brush at the bottom around the foreground subject. In the Layers panel, set the layer blend mode to Difference and drop the layer Opacity to 60%.
Step 15: Add a layer mask to this particle layer and make sure the mask is active as indi- cated by the white corner brackets around the layer thumbnail. Switch to the Gradi- ent tool, and set it to a radial Foreground to Transparent gradient with the Foreground color set to black. Add a couple of gradients in the middle of the particle effect to fade it from over the subject.
Step 16: In the Layers panel, click on the main layer thumbnail for the particle layer to activate it instead of the layer mask. Then, go under the Filter menu to Blur and choose Radial Blur. In the Radial Blur dialog, set the Amount to 7 and the Blur Method to Zoom. Click on the grid pattern and drag the center of the blur down a little relative to the posi- tion of the particles on the main canvas. Click
Step 15
Step 16
030 OK when done.
› › photoshop user › january 2017
