
Page 28 - Photoshop User January 2017
P. 28
HOW TO ››
Step 10
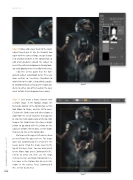
Step 10: Now add a layer mask to the larger subject layer (Layer 2). Use the Gradient tool again with the same settings, except change it to a Radial Gradient in the Options Bar, to add small gradients around the subject to reveal the pattern background. Already look- ing really good and we’re hardly finished yet.
I did feel at this point that the fore- ground subject would look better if he was more vertical, so I used Free Transform to rotate him to the right. I also added a couple of additional black to transparent radial gra- dients to either side of his head on the layer mask to fade the background even more.
Step 11: Let’s create a frame element with a simple shape. In the Toolbar, choose the Rectangle tool (U). In the Options Bar, set the Tool Mode to Shape, and the Fill to none. Click on the Stroke icon and either choose a color from the set of swatches that appears or click the multi-colored icon at the top right to open the Color Picker. We chose a bright yellow to go along with the yellow on the subject’s uniform. When done, set the Stroke thickness to 3 px in the Options Bar.
Starting near the upper-left corner, draw an inset frame like you see here. The shape layer will automatically be created in the Layers panel. Drag the shape layer to the top of the layer stack. You can also switch to the Move tool, press Command-A (PC: Ctrl-A) to Select All, then use the Align Vertical Centers and Align Horizontal Cen- ters icons in the Options Bar to center the stroke in the canvas. Press Command-D (PC: Ctrl-D) to deselect.
Step 11
028
› › photoshop user › january 2017
