
Page 27 - Photoshop User January 2017
P. 27
Step Eight: Open the other player image and bring it into the design file as well. Make sure this layer is above the first player image in the Layers panel. Drop the layer Opacity to 75% so you can see the layer below to help you size and position this foreground image. Use Free Transform again to scale and position this subject in the lower area of the canvas as shown here. Press Enter when done, then return the layer Opacity to 100%.
› › DOWN AND DIRTY TRICKS
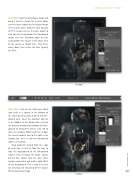
Step Eight
Step Nine
Step Nine: Click on the Add Layer Mask icon (circle in a square) at the bottom of the Layers panel to add a mask to this fore- ground layer. Select the Gradient tool (G) in the Toolbar. In the Options Bar, click on the preview thumbnail and choose the Fore- ground to Transparent preset, click OK to close the Gradient Editor, and then choose the Linear Gradient icon to the right in the Options Bar. Press X until the Foreground color is set to black.
Drag gradients inward from the edge of each side, as well as from the top, to fade the background of the foreground subject, thus revealing the larger subject behind him. Notice how the dust effect remains somewhat and adds a cool effect to the background. This is why there was no selecting and extracting of the subject for this particular image.
027
› › kelbyone.com
