
Page 69 - Photoshop User February 2017
P. 69
Step Three: With the Background copy layer still active, I selected the Unsharp Mask fil- ter from the Filter>Sharpen menu. Here, I applied an amount of 500% and a Radius of 1.0 pixel. The Unsharp Mask filter effect aggressively sharpened the image, build- ing narrow halos around all the edge detail areas, and in particular the soft edges.
Step Four: This was followed by adding a High Pass filter from the Filter>Other menu and applying a Radius of 10 pixels. This added wider, overlapping, soft-edged halos that increased the midtone contrast.
Step Five: This Background copy layer is now applying a 50% faded, Overlay blend mode sharpening effect to the Background layer below. I then Option-clicked (PC: Alt- clicked) the Add Layer Mask icon (circle in a square) in the Layers panel to add a layer mask filled with black, which hides the layer contents. I was then able to select a normal Brush (B) and paint on the layer mask with white to reveal the depth of field sharpening layer, and in doing so, add more apparent sharpness to the out-of-focus areas.
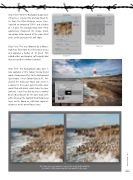
Step Four
Step Three
This shows close-up comparison views of the image before and after the depth-of-field sharpening effect was applied to the image.
069
› › kelbyone.com
