
Page 70 - Photoshop User February 2017
P. 70
SHARPENING WITH THE ADJUSTMENT BRUSH
Another option is to use the Adjustment Brush (K) in Camera Raw to edit the RAW image directly. Among the many settings for this tool are the Sharpness and Clarity sliders. A positive Sharpness slider setting can be used to add extra sharpening to an image. This increases the Amount slider setting, and the additional sharpening effect will be based on the same Radius, Detail, and Masking slider settings as were applied in the Detail panel. Alternatively, you can increase the global sharpness via the Detail panel
and use a negative Adjustment Brush Sharpness setting to locally apply a reduced amount of sharpness to tame the global sharpening.
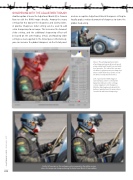
Above: This photograph was taken
of a vintage racing car driven at speed using a long focal length lens and wide lens aperture. The side of the car and the driver’s right arm are pin-sharp, but there’s a fall-off in focus on the rest of the driver’s body and his helmet.
Left: I opened the RAW image in Camera Raw, where I selected the Adjustment Brush. In the settings section I applied +100 Sharpness. With the Mask option checked at the bottom, I painted over the areas where I needed to add extra sharpening.
On the left you can see the unsharpened version and on the right a version where the image was sharpened using the Adjustment Brush in Camera Raw.
070
› › photoshop user › february 2017
