
Page 71 - Photoshop User February 2017
P. 71
THE SHARPEN TOOL
The Sharpen tool (nested with the Blur and Smudge tools in the Toolbar in Photoshop) can also be used to brush in more sharpness. The best way to do this is to create or target an empty new layer above the image layer, select the Sharpen tool, check the Sample All Layers option from the Options Bar
OUTPUT SHARPENING
Converting pixels to a printed image on paper always incurs a loss in sharpness. This is why Photoshop users have always been advised to sharpen last of all before you print, whether you’re outputting to a desktop inkjet printer, a lab printer, or CMYK. The loss of sharpness is mainly due to the way the ink diffuses on the paper and blurs the edge detail. With CMYK output, converting pixels to CMYK printing plates also has a softening effect on the image.
The main factors that affect the output sharpening are the type of output and the file output resolution. First, you have to consider the type of media to which you’re print- ing, as the ink diffusion I mentioned is more pronounced on matte paper. The resolution is important because this deter- mines the width of the halos that have to be added.
At a normal viewing distance, the human eye can resolve detail to around 1/100th of an inch, such as when viewing a 10x8 print from a distance of 18". Therefore, if you’re print- ing a file that has a resolution of 300 pixels per inch, you’ll be looking to create halos that are 3 pixels wide. This was the principle Bruce Fraser adopted when he worked on the sharpening routines that went into the PhotoKit Sharpener plug-in, although as Bruce points out, “In the case of pho- tographers, the normal viewing distance is limited only by the length of the photographer’s nose.”
The sharpening that’s required at this stage is a lot more aggressive than any of the other sharpening described do far. You don’t want to pay too much attention to how the image looks onscreen at this point, as the correct amount of output sharpening can make your images look pretty darn ugly. The point here is to judge the final print output solely to determine what is the right amount to apply.
To be honest, any type of sharpening will help here. When I first started using Photoshop, I’d use the Unsharp Mask filter to apply a sharpening amount of 100–175 with a Radius of 0.5–1.0 and a Threshold value of 0. For a more precise approach, you can make use of the output sharp- ening available in Lightroom, where the Print module Print Job panel has a Print Sharpening option. Just select a Low, Standard, or High setting, and choose between Matte or
and paint on the empty layer to add sharpness. The original Sharpen tool in Photoshop was kind of destructive and a bit like using a router to do the job of a fret saw; however, the current version of the Sharpen tool, with the Protect Details option, adds more controlled sharpening.
Glossy media. Lightroom then auto-calculates the optimum amount of output sharpening for the size and resolution to which you’re printing. If you’ve been conservative with the capture sharpening, a Standard amount should be the right setting to choose. If you tend to apply heavy amounts of sharpening at the capture sharpen stage and like your edges to appear razor-sharp onscreen, you might want to select the Low setting when making a print.
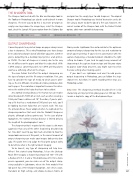
If you don’t use Lightroom and want to add precise output sharpening in Photoshop, you can follow the steps shown here. As before, it’s worth recording these steps as a Photoshop action.
Step One: The sharpening method described here is for sharpening an inkjet print on glossy paper at 300 ppi. First, I made a duplicate copy of the Background layer.
071
› › kelbyone.com
