
Page 73 - Photoshop User February 2017
P. 73
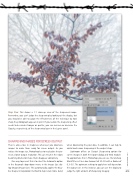
Step Five: This shows a 1:1 close-up view of the sharpened image. Remember, you can’t judge the sharpening by looking at the display, but you should be able to judge the effectiveness of the technique by how sharp the photograph appears in print. If you reckon the sharpening effect needs to be made stronger or gentler, you can increase or decrease the Opacity, respectively, of the sharpening layer in the Layers panel.
SHARPENING IMAGES FOR SCREEN OUTPUT
There’s also a loss in sharpness whenever you downsize images to make them ready for screen output. As you reduce the image size, Photoshop has to recalculate the pix- els at a lower output resolution. This can result in the edges becoming blurred or make them disappear completely.
One way to prevent this is to select the Automatic option in the Resample drop-down menu in the Image Size dia- log (Image>Image Size). This automatically applies the Bicu- bic Sharper interpolation method to help retain more detail
when downsizing the pixel data. In addition, it can help to add a touch more sharpening at the output stage.
Lightroom offers an Output Sharpening option for
screen images in both the Export dialog and Web module.
To approximate this in Photoshop you can use the Unsharp
Mask filter set to a low Amount of 25–50 with a Radius of 0.3–0.5. The optimum settings to apply here will depend on
the output size. In this instance, you can use the display to
judge the right amount of sharpening to apply. 073
› › kelbyone.com
