
Page 74 - Photoshop User February 2017
P. 74
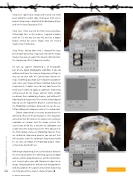
Step One: I opened an image and resized it to 1000 pixels along the widest edge. To prepare it for screen output sharpening, I duplicated the Background layer and set the layer Opacity to 50%.
Step Two: I then went to the Filter menu and chose Other>High Pass. In this instance, I applied a Radius value of 1.0, but you can vary this and use a bigger Radius setting for screen images that are resized smaller than 1000 pixels.
Step Three: Having done that, I changed the layer blend mode to Overlay. If you want to edit the image sharpening, you can adjust the Opacity slider to make the sharpening effect stronger or weaker.
To sum up, capture sharpening is an inescapable part of any digital photography workflow. If you do nothing and leave the camera sharpening settings as they are, or stick with the Camera Raw default set- tings, everything you shoot is pre-sharpened automati- cally. Since each image will have individual sharpening requirements, it makes sense to learn how to use the Detail panel sliders to apply an optimum sharpening setting based on the image content. Some photos need more than a global pre-sharpen, and will benefit from localized sharpening. This is where knowledge of how to use the Adjustment Brush in Camera Raw, or the Photoshop techniques discussed here can be use- ful for adding extra sharpness where it’s needed most.
Output sharpening is necessary to counteract the softening effects of the print process. This should be carried out last of all once the output size and pixel resolution are known and the image resized. The easiest way to do this is to print via Lightroom and enable the print sharpening via the Print Job panel in the Print module. If you use Photoshop to print, there are dedicated sharpening plug-ins you can get that will calculate what the optimum sharpening should be. Or, you can follow the Photoshop output sharp- ening steps described here.
With image sharpening, there’s a fine balance between the need to overcome the softening aspects of digital capture and the output processes, and the destructive- ness caused when you add sharpened edges to an image. Going beyond the defaults and developing the skills to customize the capture and creative sharpening
074 can help you achieve cleaner, sharper images. n ALL IMAGES BY MARTIN EVENING
Discuss this Issue
› › photoshop user › february 2017
