
Page 48 - Photoshop User February 2017
P. 48
HOW TO ››
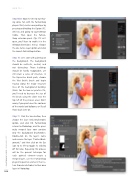
Step Nine: Now it’s time to start hav- ing some fun with the ParticleShop plug-in! First, create a merged layer by pressing-and-holding the Option (PC: Alt) key and going to Layer>Merge Visible. Then open the Particle- Shop extension panel. (Tip: If it isn’t open, you’ll have to enable it in the Window>Extensions menu.) Choose the Use Active Layer option and click the Launch ParticleShop button.
Step 10: Let’s start with painting on the background. The background should be aesthetic, neutral, and not distracting. Those buildings should be hardly recognizable, yet still retain a sense of structure. In the Expressive brush pack, choose the Wet Bristle brush and begin tracing along the major structure lines of the background building. (Note: For the low-res practice file, you’ll need to decrease the size of the brush using the slider near the top left of the preview area.) Don’t worry if you paint over the contours of the model and balloons, we’ll pull those back later on.
Step 11: Click the Save button, then choose the Save Only Brushstrokes option, and click OK. ParticleShop returns to Photoshop, and the previ- ously merged layer now contains only the background brushstrokes. Double-click on the layer’s name and rename the layer “Painted Back- ground,” and then click on the Eye icon to its left to toggle its visibility off for now. Repeating this process will be the general technique for each painted element—create a merged layer, use the ParticleShop plug-in to paint an element, then re- turn those brushstrokes to their own layer in Photoshop.
048
› › photoshop user › february 2017
