
Page 49 - Photoshop User February 2017
P. 49
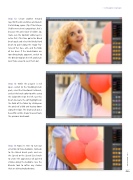
Step 12: Create another merged layer for the skin and dress and launch ParticleShop, again. (Tip: If the Merge Visible menu item is grayed out, that’s because the active layer is hidden. So, make sure the topmost visible layer is active first.) This time go to the Blend brush pack and select the Bristly Hard brush to paint along the major fea- tures of her face, arm, and the folds of her dress. If the brushstrokes are too distractingly apparent, switch to the Blender tool on the left and brush over those areas to even them out.
Step 13: While the plug-in is still open, switch to the Wedding brush pack, select the Directional Veil brush, and set the brush color to white using the Color Wheel on the left. Use this brush to create the soft highlights on the folds of the fabric by clicking on the pinch of a fold and tracing down along the ridge. The brush pulls out a beautiful veil-like shape to accentuate the previous brushwork.
Step 14: Now it’s time to turn our attention to those balloons. Go back to the Blend brush pack and use the Speed or the Speed Size brush to create the appearance of painted strokes along the balloons. Use the Blender tool to soften any strokes that are distractingly obvious.
› › DYNAMIC RANGE
049
› › kelbyone.com
