
Page 50 - Photoshop User February 2017
P. 50
HOW TO ››
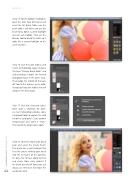
Step 15: For the balloons’ highlights, open the Core Pack of brushes and select the Art Brush. Make sure the paint color is still white and use this brush to lay down a curved highlight area on each balloon. Then use the Blender tool to blend the white so it looks like a natural highlight to the curved surface.
Step 16: Save the paint strokes, and return to Photoshop again. Rename this layer “Primary Brush Work” and click-and-drag it above the Painted Background layer in the layers stack. Then toggle the visibility of this layer off, too. In this manner, we’re build- ing up layers of paint strokes that will comprise the final image.
Step 17: Hair that’s big and curly is often quite a challenge for paint- ers, but ParticleShop provides some exceptional tools to capture the wild fun of her curly locks! Create another merged layer and name it “Hair,” then launch the plug-in once again.
Step 18: Open the Impression brush pack and select the Cream brush. This brush has a swirl behavior that feels like you’re twirling your brush into the wet paint of the painting. It’s quite fun to trace along her hair and create those curly ringlets! If the brush gets out of hand, you can always use the Eraser to remove the
050 accidental swirls.
› › photoshop user › february 2017
