
Page 46 - Photoshop User February 2017
P. 46
HOW TO ››
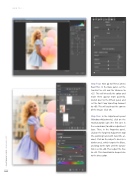
Step Four: Next go to Filter>Camera Raw Filter. In the Basic panel, set the Contrast to +33 and the Vibrance to +25. This will intensify the colors and make them appear more painterly. Switch over to the Effects panel and set the Post Crop Vignetting Amount to +80. This will wash out the corners of the image. Click OK.
Step Five: In the Adjustments panel (Window>Adjustments), click on the Hue/Saturation icon (the first one in the second row) to add an adjustment layer. Then, in the Properties panel, click on the Targeted Adjustment tool (the pointing hand with two little ar- rows). Click on the subject’s dress (in a darker area), which targets the Blues, and drag to the right until the Satura- tion is set to +46. Then adjust the Hue to +22. This should add a deeper blue to the dress color.
046
› › photoshop user › february 2017
