
Page 36 - Photoshop User February 2017
P. 36
HOW TO ››
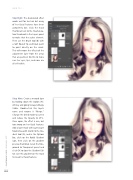
Step Eight: The desaturated effect works well for her hair but many of her facial features have been completely lost. Click the mask thumbnail next to the Hue/Satura- tion thumbnail in the Layers panel to make that the active element. Then use the Brush tool (B) with a Soft Round Tip and black paint to paint directly on the mask. This will remove the effects of the adjustment layer from the areas that are painted. Do this to make sure her eyes, lips, and nose are all still visible.
Step Nine: Create a merged layer by holding down the Option (PC: Alt) key and going to Layer>Merge Visible. Double-c l i c k this layer’s name and rename it “Merge.” Change the blend mode to screen and reduce the Opacity to 25%. Once again, the effect is nice, but too strong on her facial features. Add a layer mask with Layer>Layer Mask>Reveal All. Switch to the Gra- dient tool (G), and in the Options Bar, click on the Radial Gradient icon, then click on the gradient preview thumbnail. Select the Fore- ground to Transparent preset and click OK to close the Gradient Edi- tor. Use this gradient on the mask to reveal her facial features.
036
› › photoshop user › february 2017
