
Page 38 - Photoshop User February 2017
P. 38
HOW TO ››
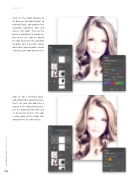
Step 12: The bright brilliance of her blue eyes has also been lost, so to bring it back, add another Hue/ Saturation adjustment layer and name it “Eye Color.” Then use the onscreen adjustment to sample the blue of her eyes. Slide the tool to the right to increase the saturation to about +44. If needed, sample closer to the pupil to make a similar edit to the cyan color tones as well.
Step 13: For a finishing touch, add a Photo Filter adjustment layer. That’s the icon that looks like a camera in the Adjustments panel. Use the Warming Filter (85) and set the Density to 25%. This adds a warm glow to the image that complements the softer focus.
038
› › photoshop user › february 2017
