
Page 40 - Photoshop User February 2017
P. 40
HOW TO ››
Beginners' Workshop how to quickly enhance local contrast
LESA SNIDER
As you’re learning in this issue, increasing contrast globally along high-contrast edges makes a photo look crisp and sharp; however, increasing local contrast in smaller regions—referred to as a local contrast enhancement or LCE—can accentuate larger details (shapes), giving your image a three-dimensional look. This column demonstrates three super-quick ways to get it done.
Step One: In Photoshop, choose File>Open as Smart Object. If you already have a photo open that consists of multiple layers, Shift-click to acti- vate all the layers, and then choose Filter>Convert for Smart Filters, which packages the active layers into a single smart object. If you’re starting in Light- room, select a photo, and then choose Photo>Edit In>Open as Smart Object in Photoshop.
Tip: To access your original layers in the future, double-click the smart object, and Photoshop opens them in a separate, temporary document. Make your changes in that document, choose File>Save (not Save As!), and then close the docu- ment. When you do, your changes appear in the original document. Sweet!
[KelbyOne members may download the file used in this tutorial at www.kelbyone.com/ magazine. All files are for personal use only.]
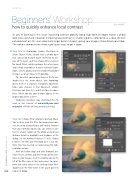
Step Two: Choose Filter>Sharpen>Unsharp Mask. You’ve likely used this filter for sharpening; how- ever, by using a larger Radius and smaller Amount than you normally would, you can enhance con- trast in smaller regions of the photo and pull out delicious details in highlights and shadows. In the dialog, set the Amount between 5–30%, Radius between 30–100, and Threshold to 0. Click OK. Note: You may need to use larger values for high- resolution images.
Here are before (top) and after (bottom) pre- views. To see a before and after version of this tech- nique in your images, click the visibility icon to the left of the filter name in the Layers panel. To experi- ment with other values in the Unsharp Mask filter, double-click the filter name in the Layers panel to
040 reopen its dialog.
› › photoshop user › february 2017
©Jack Davis/Wow Creative Arts
