
Page 41 - Photoshop User February 2017
P. 41
› › BEGINNERS' WORKSHOP
Now let’s look at using the High Pass filter to enhance local contrast. With this technique, you essentially end up with a dodge and burn layer comprised of 50% gray; however, by switching layer blend modes, the gray parts vanish, leaving you with a wonderfully high-contrast photo.
Step One: Repeat step one above to open a photo as a smart object in Photoshop.
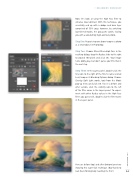
Step Two: Choose Filter>Other>High Pass. In the resulting dialog, drag the Radius slider to the right to around 180 pixels and click OK. Your image turns oddly gray, but don’t panic; you’ll fix that in the next step.
Step Three: In the Layers panel, double-click the tiny icon to the right of the filter’s name (circled here) to open its Blending Options dialog. Choose Overlay (Soft Light works, too) from the Mode pop-up menu and click OK. To see a before and after version, click the visibility icon to the left of the filter name in the Layers panel. To experi- ment with other Radius values in the High Pass filter, you guessed it, double-click the filter name in the Layers panel.
Here are before (top) and after (bottom) previews showing this super-slick technique. (Big thanks to
Jack Davis for originally teaching me this!) 041
› › kelbyone.com
