
Page 42 - Photoshop User February 2017
P. 42
HOW TO ››
Finally, let’s use HDR Toning Presets to enhance local contrast. Unfortunately, this technique only works on single-layer documents, and it doesn’t work with smart objects; however, it can produce the most dramatic result of all.
Step One: In Photoshop, choose File>Open and navigate to the photo you want to play with. If you’re starting in Lightroom, select a photo and choose Photo>Edit In>Edit in Adobe Photoshop CC, or press Command-E (PC: Ctrl-E).
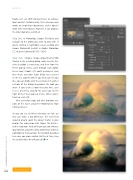
Step Two: Choose Image>Adjustments>HDR Toning. In the resulting dialog, make sure the Pre- view checkbox is turned on, and then from the Preset pop-up menu, cycle through each option to see how it looks. (It’s worth peeking at each one—heck, our own Scott Kelby has a preset in the list, Scott5!) When you find a preset you like, you can fiddle with the settings in the other sections of the dialog to produce the look you want. If you create a look that you love, save it as a preset by clicking the gear icon to the right of the Preset pop-up menu. When you’re finished, click OK.
Here are before (top) and after (bottom) ver- sions of the wave using the Photorealistic High Contrast preset.
As you can see, all three techniques are fast, yet they can make a big difference. The end result depends greatly upon the subject matter in your photo—the more large-scale shapes the better— and its resolution. And, while you can also enhance local contrast using the Clarity and Dehaze sliders in Lightroom or Camera Raw, the methods described here give you more control. Until next time, may the creative force be with you all! n
042
Discuss this Issue
› › photoshop user › february 2017
