
Page 35 - Photoshop User February 2017
P. 35
› › DOWN AND DIRTY TRICKS
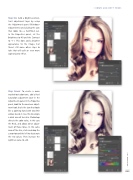
Step Six: Add a Brightness/Con- trast adjustment layer by using the Adjustments panel (Window> Adjustments) and clicking the icon that looks like a half-filled sun. In the Properties panel, set the Brightness to 40 and the Contrast to –11. This does add a brighter appearance to the image, but there’s still some other steps to take that will craft an even more sophisticated effect.
Step Seven: To create a more washed-out color tone, add a Hue/ Saturation adjustment layer in the Adjustments panel. In the Properties panel, look for the onscreen adjust- ment tool; that’s the icon that looks like a pointing hand with two little arrows beside it. Use this to sample a dark area of her skin. Photoshop detects the color value, in this case the Reds, and allows direct adjust- ment of those tones. In this same area of the skin, click-and-drag the cursor toward the left to desaturate the red values. Then increase the Lightness value to +34.
035
› › kelbyone.com
