
Page 33 - Photoshop User February 2017
P. 33
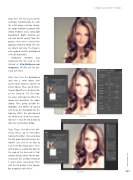
Step One: The real success of this technique fundamentally lies with the initial image selection. Ideally, the image should be a portrait with strong midtones and a solid color background. Bright, detailed eyes will also benefit greatly from this process. Here we’ve selected this gorgeous shot of a model. Her eyes are vibrant and clear, the image is well exposed, and the background is free of distractions.
[KelbyOne members may download the file used in this tutorial at http://kelbyone.com /magazine. All files are for per- sonal use only.]
Step Two: Turn the Background layer into a smart object with Layer>Smart Objects>Convert to Smart Object. Then, go to Filter> Camera Raw Filter. In the Basic tab, set the Clarity to –30. The nega- tive value will begin to soften the image and desaturate the colors slightly. Then, pump up both the Highlights and Whites to around +63 to lay the foundation for the high-key effect. We also lowered the Vibrance to –8 and set Satura- tion to +1. Click the OK button to close the Camera Raw dialog.
Step Three: To further the soft- ening effect, go to Filter>Blur Gallery>Field Blur. Click-and-drag the blur point directly between the model’s eyes and set the Blur to 3 px in the Blur Tools panel. Then click to place a second blur point at the edge of her hair and set that amount to 8 px. (Note: For the low- res practice file, use Blur settings of 1 and 3 pixels, respectively.) Then click the OK button in the Options Bar to apply the blur effect.
Step Two
› › DOWN AND DIRTY TRICKS
Step One
Step Three
033
› › kelbyone.com
©Adobe Stock/edwardderule
