
Page 84 - Photoshop User December 2016
P. 84
HOW TO ››
Step Nine: Next, let’s add a bit of Christmas feel to the text by making it green and adding a Satin effect. To change the color of your text, highlight it with the Type tool. In the Con- trol panel, double-click on the Fill icon (it has a big T in it) to open the Color Picker. Select a green color and click OK. You’ll need to switch to the Selection tool before you can apply the Satin effect. With the text frame selected, go to Object>Effects>Satin. You can play with these settings until you’re happy, but the default works just fine (I did raise the Opacity to 70%). Click OK.
Step 10: We need our retro paper texture to add to the cover. Head over to DesignCuts.com and click on Freebies. Choose the 100 Grungy Paper and Card Textures–Sample Pack, and click Download. You can click here for a direct link to that page. You’ll just need to sign up for a free account, and then you can download and use the textures in the pack.
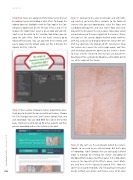
Step 11: Go back to the cover in InDesign, and with noth- ing selected, go to File>Place, navigate to the folder of textures that you just downloaded, select the Paper and Cardboard_062.jpg file, and click Open. Now click-and- drag until the file covers the entire cover. Hover your cursor just outside one of the corner points of the texture’s frame until you see the curved, double-headed arrow, hold the Shift key, and click-and-drag to rotate the texture 90° (the Shift key constrains the rotation to 45° increments). Drag the texture so it covers the entire page again, and then click-and-drag adjustment points on the texture’s frame to resize it to the red bleed lines that are just outside the boundary of the card (you’ll probably need to zoom out to see all the edges of the frame).
Step 12: We can’t see the card design behind the texture, though, so we need to use a blend mode. But that’s only in Photoshop, right? Wrong! We can also apply a blend mode in InDesign by selecting the texture and going to Window>Effects to open the Effects panel. In the drop-down menu at the top left of the Effects panel, select Multi- ply, and then set the Opacity to around 50%. Now the cover has an aged retro look. (Tip: To quickly preview your design without any guides and frames, press W on your
084
› › photoshop user › december 2016
