
Page 82 - Photoshop User December 2016
P. 82
HOW TO ››
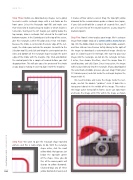
Step Three: Before we download any images, we’re going to create a white rectangle shape with a red stroke on the front cover. Select the Rectangle tool (M) and make sure that View>Grid & Guides>Snap to Guides or Smart Guides is turned on. Starting at the left margin, just slightly below the top margin, draw a rectangle that extends to the right and bottom margins. In the Control panel at the top of the screen, give this rectangle a white Fill color and a 10-pt red Stroke. Because the stroke is centered on the outer edge of the rect- angle, the stroke goes outside the margins. So switch to the Selection tool (V), and click-and-drag the center points on the sides and bottom of the rectangle shape to align the outer edge of the stroke with the margins. (Tip: Click-and-hold on the control points for a couple of seconds before you start dragging them. This will give you a live preview of the stroke as you drag it, making it easier to align it with the margins.)
it makes all four corners curved. Drag the top-right yellow diamond to the second column guide as shown here (again, if you click-and-hold for a couple of seconds first, you’ll get a live preview of the rounded corners as you drag the diamond point).
Step Five: Now it’s time to place your image. We’re using an image from Adobe Stock of a camera with a Santa hat on top. (On the Adobe Stock site, log in to your Adobe account, and then click on Save Preview to My Library to the right of the image to download a watermarked image directly to your CC Libraries panel in InDesign.) We want to place our image into the rectangle, so click on the rectangle to make it active, then choose File>Place, select the image from it’s saved location, and click Open. Since it was active, the image will be placed directly into the rectangle. (If you downloaded the watermarked Adobe preview, you can drag it from your CC Libraries panel, and click inside the rectangle to place the image inside it.)
We need to move and resize the image inside the rect- angle, so click the double “grabber” circle (it looks like a transparent donut) in the middle of the image. This makes the image active instead of its frame, so we can now move and resize the image until it fits within the shape as shown
Step Four: We want to give the rectangle shape rounded corners, and this is really simple to do. With the rectangle shape active, click the small yellow block that appears just below the top-right corner of the shape. Once you do this, all the corner points will change to yellow diamonds. Click-and-drag any of these 082 yellow diamonds inward, and
› › photoshop user › december 2016
©Adobe Stock/Vitaliy
