
Page 83 - Photoshop User December 2016
P. 83
(again, click-and-hold for a couple of seconds for a live pre- view before you begin dragging). Press Command-– (PC: Ctrl-–) several times to zoom out so you can see the edges of the image to resize it. Hold the Shift key while dragging corner points to maintain proportions.
We can always move this image around and resize it, as it’s a live link. We’re working nondestructively, just like in Photoshop. So far we’ve done things you know how to do in Photoshop: Draw a rectangle, apply a color and stroke, and also add rounded corners. The placing of an image inside a shape is like using a clipping mask in Photoshop; the image is only visible inside the shape.
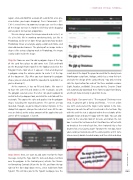
Step Six: Now we want to add a polygon shape at the top of the card for a place to add some text. Click-and-hold on the Rectangle Frame tool (F) in the Toolbar and select the Polygon Frame tool when it appears. Click-and-drag out a polygon using the column guides to center it at the top of the document. (Tip: After you start drawing the polygon shape, you can click-and-hold the Spacebar to reposition it as you’re drawing it.)
At the moment, it has no Fill and Stroke. We want it to have the same Fill and Stroke as the rectangle, so with the polygon selected, press the letter I on your keyboard to switch to the Eyedropper tool, and click the red stroke of the rectangle. This copies the style and applies it to the polygon shape, including the rounded corners. The corners are too rounded, though, so go to Object>Corner Options. In the dialog that appears, change the radius to 5 mm. All the cor- ners are linked, so this radius amount will be applied to each corner of the polygon. Click OK.
Step Seven: Next, we want to add some text for the front message. Using the Type tool (T), click-and-drag a text box over the polygon. In the Control panel, activate the Charac- ter Formatting Controls (A) on the far left, and from the top right of the font drop-down menu, select Add Fonts from Typekit. This will take you to the Typekit webpage. Use the
search bar at the top of the page to search for the lovely Laura Worthington script font, Voltage, which has a retro feel to it and suits the design of the card perfectly. You only need to click the Sync button for each of the three available versions (Light, Regular, and Bold). Once you do this, Creative Cloud will automatically download these fonts to your Font library, and they’ll show instantly in your font menu.
Step Eight: Our cover text is “The magic of Christmas never ends, its greatest gift is family and friends...” I’ve set a font size to fit and selected the Align Center option in the Con- trol panel so each line of text is centered in the text box. Play with this until the text is adjusted within the red stroke of the polygon shape and you’re happy with the look. You can also switch to the Selection tool (V) to resize and rotate the text box. I resized the text box so that I had four lines of text with no breaks at the end of each line, then I rotated it by a few degrees for a nice jaunty angle! To rotate the text box, hover your cursor just outside one of the corner points until it turns into a curved, double-headed arrow, and then click-and-drag.
› › INDESIGN SPECIAL TUTORIAL
083
› › kelbyone.com
