
Page 85 - Photoshop User December 2016
P. 85
› › INDESIGN SPECIAL TUTORIAL
keyboard. Press W again to reveal the guides. Just make sure you don’t have any text active, because you’ll type the letter “W” instead.)
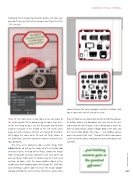
Step 13: The front cover is now done so we can move to the inside spread. We’re going to repeat some steps here, so the first thing to do is use the Rectangle tool to draw another rectangle in the middle of the left inside cover page, but not as large as the one we created on the front. We’ll apply the same white Fill and red 10-pt Stroke as we did before, and then round the corners using the yel- low diamonds.
This time we’re going to add a vector image from Adobe Stock. So click on the shape with the Selection tool to make it active, then go to File>Place, choose the image from its location on your computer, and click Open (or you can drag it from your CC Libraries panel). It will need resizing, so again, click the image grabber donut in the middle and, while holding down Shift-Option (PC: Shift-Alt), click-and-drag a corner point to resize the image propor- tionally and from the center. Resize until there’s some white
space between the camera graphics and the red stroke, and you’re done with the left side of the card.
Step 14: Now we need to set our text on the right-hand page. As before, draw a text box about the same size as the rect- angle shape on the left page. In the Control panel, make the font size about 60 pt, choose Voltage Bold as the font, and the Center Align option. Then type “...just kidding, camera gear is the greatest gift ever!” Change this to the same green as the text on the cover, and apply the same Satin object style as before.
085
› › kelbyone.com
©Adobe Stock/muchmania
