
Page 41 - Photoshop User December 2016
P. 41
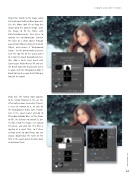
Step Five: Switch to the image called FallingSnowOnBlackBackground. Use the Move tool (V) to drag this image onto the portrait image. Scale the image to fill the frame with Edit>Transform>Scale. Press Enter to commit the transformation. Convert the layer to a smart object through Layer>Smart Objects>Convert to Smart Object, and rename it “Background Snow.” Set the blend mode to Screen near the top left of the Layers panel to render the black background invis- ible. Add a white layer mask with Layer>Layer Mask>Reveal All and use the Brush tool with black paint (press X again until the Foreground color is black) to hide the snow that’s falling in front of the model.
Step Six: The falling snow appears to be simply floating in the air; the effect will be more successful if there’s a sense of motion to it, so click on the Background Snow layer thumb- nail in the Layers panel and go to Filter>Blur>Motion Blur. Set the Angle to 58°, the Distance to around 12 pix- els (for a high-res image, use around 50 pixels), and click OK. The filter is applied as a smart filter, so if these settings aren’t to your liking, you can always double-click the name of the filter in the Layers panel to come back and change them.
› › DOWN AND DIRTY TRICKS
041
› › kelbyone.com
