
Page 40 - Photoshop User December 2016
P. 40
HOW TO ››
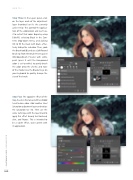
Step Three: In the Layers panel, click on the layer mask of the adjustment layer thumbnail so it’s the currently active entity. This controls the applica- tion of the colorization and we’ll use it to restrict that color. Begin by using Edit>Fill, selecting Black in the Con- tents drop-down menu, and clicking OK to fill the mask with black, effec- tively hiding the red color. Then, grab the Brush tool (B) and use a Soft Round Brush tip from the Brush Presets panel (Window>Brush Presets) with white paint (press X until the Foreground color is set to white) to gently brush the color onto the cheeks and nose of the model. Use the Bracket keys on your keyboard to quickly change the size of the brush.
Step Four: The opposite effect of the rosy cheeks is that areas with less blood tend to lose color. Add another Hue/ Saturation adjustment layer and reduce the Saturation to –34. Then use the same technique with the layer mask to apply this effect to only her forehead, chin, and fingers. This is intended to be a subtle effect, so be gentle with its application.
040
› › photoshop user › december 2016
