
Page 39 - Photoshop User December 2016
P. 39
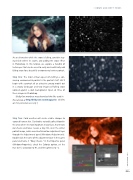
As an alternative while the snow is falling, consider stay- ing inside where it’s warm, and adding the snow effect in Photoshop. In this tutorial, we explore a handful of techniques that can be used to easily and realistically add falling snow for a beautiful environmental winter portrait.
Step One: The most critical aspect of crafting a con- vincing environmental portrait is the portrait itself. We’ll begin with a portrait of an attractive young model out in a snowy landscape and two images of falling snow isolated against a dark background. Open all three of these images in Photoshop.
[KelbyOne members may download the files used in this tutorial at http://kelbyone.com/magazine. All files are for personal use only.]
Step Two: Cold weather will create visible changes to exposed human skin. Our bodies naturally collect blood in the areas where it’s most important. In our faces, that means our cheeks and noses receive a rosy tint, so in the winter portrait image, add a new Hue/Saturation adjustment layer through the Adjustments panel (Window>Adjustments). Double-click the name of the adjustment layer in the Layers panel and name it “Rosy Cheeks.” In the Properties panel (Window>Properties), check the Colorize option, set the Hue to 15, Saturation to 91, and the Lightness to –2.
› › DOWN AND DIRTY TRICKS
039
› › kelbyone.com
©Adobe Stock/ikonacolor ©Adobe Stock/Mexrix
©Adobe Stock/kopitinphoto
