
Page 37 - Photoshop User December 2016
P. 37
› › DOWN AND DIRTY TRICKS
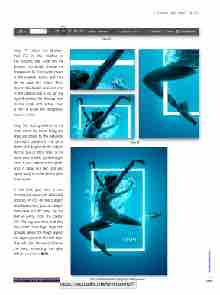
Step 17: Select the Gradient tool (G) in the Toolbar. In the Options Bar, click on the preview thumbnail, choose the Foreground to Transparent preset in the Gradient Editor, and click OK to close the Editor. Then, choose the Radial Gradient icon in the Options Bar. Click on the layer thumbnail for this top layer so the mask isn’t active. Press D then X to set the Foreground color to white.
Step 18: Add gradients in the areas where her limbs, body, and dress are closest to the rectangle. Start each gradient in the white stroke and drag it into the subject. Do this two or three times in the same area to build up the bright- ness. I also added some gradi- ents in areas like her face and upper body to enhance the glow even more.
In the end, you have a cool illuminated piece with believable lighting effects on the subject. As a final option, you can drop in some text as I did here. Set the text in white, hold the Option (PC: Alt) key, and click-and-drag the Outer Glow layer style that appears below the shape layer in the Layers panel to the text layer. This will copy the same glow to the text, enhancing the glow effect even more. ■
Step 18
Step 17
CLICK TO RATE
Click-and-hold on the image for a before view
037
› › kelbyone.com
