
Page 35 - Photoshop User December 2016
P. 35
› › DOWN AND DIRTY TRICKS
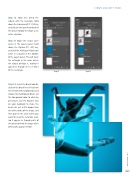
Step 12: Now let’s blend the subject with the rectangle. Hold down the Command (PC: Ctrl) key and click on the layer thumbnail of the dancer to load her shape as an active selection.
Step 13: Make the shape layer active in the Layers panel, hold down the Option (PC: Alt) key, and click the Add Layer Mask icon (circle in a square) at the bottom of the Layers panel. This will mask the rectangle in the areas where the subject overlaps it, making it appear as though she is in front of the rectangle.
Step 14: Select the Brush tool (B), click on the Brush Preset Picker on the left side of the Options Bar, and choose the Hard Round Brush. Set the Foreground color to white by pressing D. Use the Bracket keys on your keyboard to make the brush size just a little bigger than the white stroke of the shape, and then paint in the areas where you want to reveal the rectangle, mak- ing it appear as though parts of the girl are behind the shape while other parts appear in front.
Step 12
Step 13
035
› › kelbyone.com
