
Page 34 - Photoshop User December 2016
P. 34
HOW TO ››
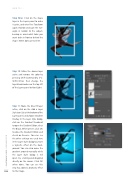
Step Nine: Click on the shape layer in the Layers panel to make it active, and enter Free Transform again. Position and scale the rect- angle in relation to the subject, bearing in mind what limbs you want to be in front or behind the shape. When done, press Enter.
Step 10: Make the dancer layer active and remove the color by pressing Shift-Command-U (PC: Shift-Ctrl-U), then change the layer blend mode near the top left of the Layers panel to Hard Light.
Step 11: Make the blue fill layer active, click on the Add a Layer Style icon (ƒx) at the bottom of the Layers panel, and choose Gradient Overlay. In the Layer Style dialog, click on the Gradient thumbnail to open the Gradient Editor; select the Black, White preset; click OK to close the Gradient Editor; and check on Reverse. You can see the other settings we used here in the Layer Style dialog to create a vignette effect on the back- ground. You can also move the gradient around manually while the Layer Style dialog is still open by clicking-and-dragging directly on the canvas. Click OK when done. You can see this step has added a dramatic effect
034 to the image.
› › photoshop user › december 2016
