
Page 33 - Photoshop User December 2016
P. 33
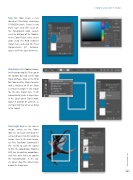
Step Six: Now create a new document (File>New) measuring 1500x2000 pixels. Create a new blank layer and then click on the Foreground color swatch near the bottom of the Toolbar. In the Color Picker, select a blue color using the RGB numbers shown here, and click OK. Press Option-Delete (PC: Alt-Back- space) to fill the layer with blue.
Step Seven: In the Toolbar, choose the Rectangle tool (U). Then, go to the Options Bar and set the tool mode to Shape. Also, set the Fill to No Color and the Stroke to white with a thickness of 35 px. Draw a vertical rectangle in the image like the one shown here. It will automatically create a shape layer in the Layers panel. Don’t worry about its position or scale yet, as we’ll get into that when we bring in the subject.
Step Eight: Back in the dancer image, switch to the Move tool (V), and click-and-drag the extracted layer into this working image. Once in the main image, use Free Transform (Command-T [PC: Ctrl-T]) to scale the subject to fit in the composition. Hold the Shift key to maintain proportions, and then press Enter to commit the transformation. In the Lay- ers panel, drag the subject layer below the shape layer.
› › DOWN AND DIRTY TRICKS
033
› › kelbyone.com
