
Page 31 - Photoshop User December 2016
P. 31
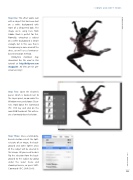
Step One: This effect works well with a subject that has been shot on a white background with more of a silhouetted look. The image we’re using here from Adobe Stock is perfect for this. Normally, extracting a subject on a white background is simple enough, but in this case there’s transparency in some areas of the dress, so we’ll use a luminance- based extraction method.
[KelbyOne members may download the file used in this tutorial at http://kelbyone.com /magazine. All files are for per- sonal use only.]
Step Two: Open the Channels panel, which is located next to the Layers panel, or go under the Window menu and choose Chan- nels. Hold down the Command (PC: Ctrl) key and click on the main RGB thumbnail. This will cre- ate a luminosity-based selection.
Step Three: Since a luminosity- based selection selects the light- est parts of an image, the back- ground and some lighter areas of the subject will be selected in this image. All you need to do is flip the selection from the back- ground to the subject by going under the Select menu and choosing Inverse, or press Shift- Command-I (PC: Shift-Ctrl-I).
› › DOWN AND DIRTY TRICKS
031
› › kelbyone.com
©Adobe Stock/snaptitude
