
Page 43 - Photoshop User December 2016
P. 43
› › DOWN AND DIRTY TRICKS
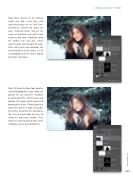
Step Nine: Return to the portrait image and add a new layer with Layer>New>Layer or use Shift-Com- mand-N (PC: Shift-Ctrl-N). Name the layer “Scattered Snow” and use the newly minted brush with white paint to gently dab some snowflakes onto the model’s hair and coat. (You’ll want to single-click to apply the snow- flakes rather than click-and-drag.) The scattering of the brush makes it a bit uncontrollable so use the Eraser Tool (E) to remove stray flakes.
Step 10: Using the Move tool, drag the SnowFallingNightSky image onto the portrait file. Use Edit>Free Transform or Command-T (PC: Ctrl-T) to scale and position this image into the lower-left portion of the frame. It should cover just more than half the height and width. Press Enter to commit the transforma- tion. Set the blend mode to Screen to render the black areas invisible. Then, reduce the layer Opacity to 56% so the snowflakes aren’t overly prominent.
043
› › kelbyone.com
