
Page 18 - Lightroom Magazine Issue 27
P. 18
› › lightroom magazine › ›
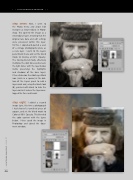
step seven: Next, I went to the Photo menu and chose Edit In>Open as Smart Object in Photo- shop. This opened the image as a smart object layer, meaning that the original raw data and edit settings were preserved within this layer. To this, I copied-and-pasted a scan of a vintage photographic plate as a new layer. I went to the Layers panel blend menu and set the blend mode to Overlay at 62% Opacity. The Overlay blend mode effectively multiplies the dark tones and screens the light tones with the layer below (while preserving the highlights and shadows of the base layer). I then clicked on the Add Layer Mask icon (circle in a square) at the bot- tom of the Layers panel to add a layer mask and, using the Brush tool (B), painted with black to hide the layer contents where the layer over- lapped the face and hands.
step eight: I added a second image layer, this time a photograph I had shot of a tarnished piece of copper, and set the blend mode to Color at 88% Opacity. This blended the color content with the layers below. I then saved the image in Photoshop and closed the docu- ment window.
018
› › lightroom magazine › issue 27
