
Page 16 - Lightroom Magazine Issue 27
P. 16
› › lightroom magazine › ›
016
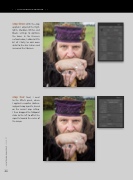
step three: With the crop applied, I adjusted the High- lights, Shadows, Whites, and Blacks settings to optimize the tones. In the Presence section below, I added a little bit of Clarity to add more detail to the skin texture and increased the Vibrance.
step four: Next, I went to the Effects panel, where I applied a negative (darken- ing) post-crop vignette, based on the current crop setting. I then dragged the Midpoint slider to the left to offset the vignette toward the center of the image.
› › lightroom magazine › issue 27
