
Page 15 - Lightroom Magazine Issue 27
P. 15
› › lightroom magazine › ›
I was introduced to Nick a couple of years ago when my wife and I moved to the countryside. Quite amazingly, he remembered meeting me once before at a photo shoot 30 years ago! At that time, I was photographing the talent for a movie poster, and Nick was working as a bodyguard for the actor. Last year, I arranged to make a short film about him and take some portrait photos at the Milton Keynes Peace Park stone circle he designed and built him- self. It was a place of special significance to Nick and, therefore, an ideal location to shoot some portraits. In this photo, I got him to stare directly into the camera and included his hands, as I wanted to focus on the rings and bracelet he was wearing.
The following steps show how I transformed the original photograph, shot with a digital SLR, into a photograph that looked like it had been produced using an old-fashioned photographic process. The initial stages in Lightroom were fairly routine. I first needed to lighten the image and refine the tone contrast before creating the look of a vintage photo. I added a darken- ing vignette to simulate the effect of the lens fall-off toward the edges of the picture, and I also added a softening and blurring effect to the corners of the frame with the Radial Filter using a negative Sharpness setting. The idea here was to reproduce the effect of an old lens where you would expect the sharp- ness to deteriorate at the edges. It’s possible to strengthen the blurring by duplicating such adjustments; however, the cumulative amount of blurring you can achieve will diminish after three passes of negative sharpening.
The photographic plate image came from lostandtaken.com, and they have a few other film backgrounds that are similar to the one used here (they are free to download, but donations are welcome). Using Photoshop, I was able to overlay this as a layer on top of the image layer. A second layer added a subtle, color tarnished look to the photograph to com- plete the distressed appearance. Looks take a closer look at the steps in this process.
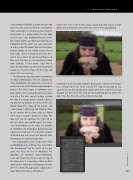
step one: Here is the before image, which was shot using a Canon digital SLR and includes part of the stone circle in the background.
step two: In the Develop module’s Basic panel, I lightened the Expo- sure, setting it to +1.75. I then selected the Crop Overlay tool (R) and adjusted the handles to crop more tightly around the subject’s face and dragged just outside of the crop overlay bounding box to rotate the crop. Press R or Enter to exit the Crop Overlay tool.
015
› › kelbyone.com
