
Page 17 - Lightroom Magazine Issue 27
P. 17
› › lightroom magazine › ›
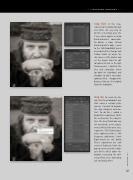
step five: In this step, I converted the photo to black and white. An easy way to do this is to simply press the V key, which applies an auto black-and-white conversion. To obtain a more refined black-and-white look, I went to the HSL/Color/B&W panel and adjusted the Orange and Yellow sliders to make the skin tones a little darker and set the Purple slider to +65 to lighten the hat. In the Split Toning panel, I adjusted the Hue and Saturation sliders for both the Highlights and Shadows to add a sepia-tone coloring effect. I dragged the Balance slider to +3 to slightly favor the Highlights.
step six: To create the illu- sion that this photograph was shot using a vintage plate camera, I wanted to degrade the edge sharpness and con- trast. To do this, I added a Radial Filter adjustment (Shift- M) centered on the subject’s face. The Invert Mask box was left turned off, so the adjust- ments affected the outer area. I applied a –100 Clarity adjust- ment combined with a –100 Sharpness adjustment. I then Right-clicked on this Radial Filter’s adjustment pin and selected Duplicate from the pop-up menu to add a dupli- cate of the effect above the original, increasing the soft- ening effect. Press Shift-M to exit the Radial Filter.
017
› › kelbyone.com
