
Page 35 - Lightroom Magazine Issue 25
P. 35
› › lightroom magazine › ›
walkthrough
Begin by either choosing a preset, or by selecting an Artistic Style. I’ve started with the Colorful preset found in the Oil Paint folder in the Presets panel—mostly because of the low detail and obvious strokes. Once you’ve selected a preset, close the Presets panel by clicking on the arrow in the center of the left side. Now let’s work our way through the effect parameters panels.
Background: This panel (see bottom of previous page) globally controls the look of the photo. The parameters that appear in this panel depend on the Artistic Style. Since we selected one of the Oil Paint presets, it automatically set the Artistic Style to Oil Paint. If we select the Pencil Sketch option, for example, in the Artistic Style drop-down menu, the Background panel will have different settings than the paint-based style that’s already been selected for us.
Brush Size controls the effective width of the stroke. Smaller means more detail. Photorealism controls how much the painted version looks like the original photo. Low values are more art-like, with high values being more like the photo. I went for 25 to keep it painterly.
Paint Thickness controls the density of paint being laid down, Stroke Length controls the average length of the
brush stroke, and Color Variation controls the addition of random color for a more painterly effect. Brush Style allows you to select from four brushes: Default, Soft, Rough, or Bristle (I’ve gone for Bristle Brush).
Random Seed effectively acts as a painting style. You can enter the four-digit number directly, or click the button to randomly change to a different seed.
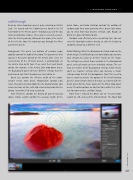
Detail Masking: While the Background settings work on the whole image, Detail Masking (see below) allows you to make local changes by using up to three masks on the image. The settings here match those available in the Background panel, and each mask can have individual settings. The set- tings are relative to the Background settings, which means you’ll see negative settings when you decrease a mask’s settings below that of the Background. (You’ll first need to paint a mask to activate the options in the Detail Masking panel.) I wanted more detail in the rock, so I started with the Detail preset for the mask, located in the Effect drop-down menu. The other options are Abstract for a softer feel, Struc- ture for more texture, and No Change.
From there I reduced the Brush Size to –74 and Stroke Length to –48, and used the Default Brush. The Mask Tool
035
› › kelbyone.com
