
Page 34 - Lightroom Magazine Issue 25
P. 34
› › lightroom magazine › ›
to choose between a two- or three-column view. You can also drag the edge of the Presets panel to make the panel and the thumbnails larger.
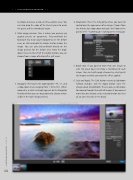
2. Main image preview: Here is where you preview any applied presets or parameters. Press-and-hold the Backslash key (\) on your keyboard to see the before view, or click-and-hold the Before button below the image. You can also click-and-hold directly on the image preview for the before view. From the drop- down menu to the left of the Before button, you can choose from a range of before/after split views.
3. Navigator: This houses the zoom options—Fit, 1:1, and a drop-down menu ranging from 1:16 to 16:1. When zoomed in, a white rectangle appears on the Navigator thumbnail that you can drag around to change what’s visible in the main image preview.
4. Parameters: This is the nitty-gritty, where you have full control over the appearance of an image. Choose from the Artistic Style drop-down to begin. We’ll look at the panels in the “walkthrough” starting on the next page.
5. Batch strip: If you opened more than one image to edit, this panel opens to show a thumbnail of each image. You can batch-apply changes by selecting all the images to which you want the effect applied.
6. Quit and Apply: The Quit button returns to Lightroom without changes, and the Apply button saves the changes back to Lightroom. There’s also a set of arrows for moving through the batch of images (if you opened more than one image), and a selection button to select all, or just select one in the batch.
034
› › lightroom magazine › issue 25
