
Page 18 - Lightroom Magazine Issue 25
P. 18
› › lightroom magazine › ›
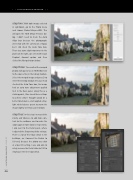
step two: With both images selected in Lightroom, go to the Photo menu and choose Photo Merge>HDR. This will open the HDR Merge Preview dia- log. I didn’t need to check the Auto Align box because the photographs were shot with the camera on a tripod, but I did check the Auto Tone box. There was some slight movement in the plants on the right, so I selected the Low Deghost Amount option and then clicked the Merge button below.
step three: The result of the merged photos will appear as an HDR DNG next to the source files in the Library module. Select the merged image and press D to enter the Develop module. Because I had checked the Auto Tone box, the image had an auto tone adjustment applied to it in the Basic panel. Using this as a starting point, I fine-tuned these settings to achieve what I thought would be a better tone balance, and I applied a Day- light white balance preset to warm the image slightly (see Basic panel below).
step four: In this step I increased the Clarity and Vibrance to add more con- trast to the midtones and to make the colors appear more vibrant, respectively. I also went to the Detail panel, where I adjusted the Sharpening slider settings. There’s a lot of fine-edge detail in the buildings, so I lowered the Radius to 0.9 and, because the photo was shot at a low ISO setting, I was also able to safely increase the Detail slider to 100 to emphasize the fine-edge detail.
018
› › lightroom magazine › issue 25
