Page 17 - Lightroom Magazine Issue 25
P. 17
› › lightroom magazine › ›
In actual fact, Shaftesbury is a quiet, genteel English town set in Thomas Hardy country. I studied photography at the nearby Salisbury College, and some of my fellow students created a brilliant pastiche of Ridley Scott’s ad, where they updated it giving the delivery boy a skateboard. I can’t remember quite how the skateboarder was able to negotiate the cobbled street, but they somehow managed to make it work!
Situated at the highest point in the county, and with steep streets everywhere, the town also has some of the fittest retirees, who were all very friendly. “You should come back later and photograph around 3:15,” said a passerby. “That’s when you’ll get the best light on the houses.” Who needs The Photographer’s Ephemeris app when you have knowledgeable locals like this?
photography and image processing
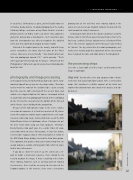
As it happened, my visit to Shaftesbury had to be a brief, early- morning stop-off on my way to a meeting nearby. I therefore had to make the most of the available light. I quite actually liked the way the light reflecting off the ancient town wall added a nice dappled light on the houses. I managed to find an angle from which to photograph that hid all the scaffolding on the left and the cars parked at the bottom of the hill, and which fitted a classic dividing-thirds composition.
Because of the high-dynamic range in the scene, I shot a succession of exposures at a fixed lens aperture of f/8, where I varied the exposure amount by one stop between each expo- sure over a four-stop range. I planned to make use of the HDR Photo Merge feature in Lightroom, where I find you can get the best results from using just two exposures. Therefore, bracketing one stop apart gave me a wider choice of expo- sures from which to select. For example, in Step One below, I selected one exposure shot at 1/50 and another at 1/200. In the HDR Photo Merge dialog I checked the Auto Tone option. This is optional, but applies a Basic panel auto setting that can usually provide a suitable starting point from which to make further tone refinements.
If you do as I did here and set up the camera on a tri- pod to shoot a bracketed sequence, there should be no need to deghost the image. If there’s anything in the frame that’s moving, however, such as running water or moving tree branches, then it will be necessary to select one of the Deghost options. In this instance, there were a few plants
growing out of the wall that were moving slightly in the wind, so I selected a Low Deghost Amount to deal with this small amount of subject movement.
To bring out more detail in the clouds I could have used the Dehaze slider in the Effects panel. But you’ll notice that in the final step, I added a Dehaze adjustment as a Graduated Filter effect. This selective approach is better because I only needed to “dehaze” the sky, rather than the whole photograph, so it made sense to only apply this adjustment to the sky and not have it degrade the tone and color detail in the foreground.
the processing steps
Let’s take a closer look at all the steps I used to process this image in Lightroom.
step one: To start with, select two exposures from a brack- eted series that range from light to dark. Here, I selected one image that contained a suitable amount of sky detail and another that showed more tone detail in the houses and cob- bled street.
017
› › kelbyone.com


