
Page 19 - Lightroom Magazine Issue 25
P. 19
› › lightroom magazine › ›
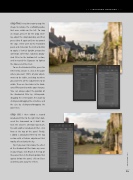
step five: It was time now to crop the image to remove the scaffolding poles that were visible on the left. To crop an image, press R for the Crop Over- lay, adjust the crop boundary, and then press either R again or Enter to commit the crop. I then went to the Transform panel and clicked on the Vertical button to apply a Vertical Upright perspective correction. After that, I added a Gradu- ated Filter to the bottom-left section, and increased the Exposure to lighten the houses and the street.
To use the Graduated Filter, press the letter M to activate it, click at the point where you want 100% of your adjust- ments to be visible, and drag to where you want 0% of the adjustments to be visible. Then use the sliders in the Grad- uated Filter panel to make your changes. You can always adjust the position of the Graduated Filter by clicking-and- dragging the center point, the angle by clicking-and-dragging the centerline, and the size by clicking-and-dragging the outer lines.
step six: I then added a second Graduated Filter to the right that dark- ened the stonework so it didn’t dis- tract the viewer’s attention too much. To add another Graduated Filter, click New at the top of the panel. Finally, I added a Graduated Filter to the top section with a Dehaze adjustment that mostly affected only the sky.
Tip: If you want to remove the effect of the Graduated Filter from any areas in your image, click Brush at the top of the panel, then in the Brush options that appear below the panel, click on Erase and then paint away the effects.
019
› › kelbyone.com
